
Growing Vegetables in the Klamath-Trinity
Planning the Garden
Timing is everything when gardening in the Klamath-Trinity – the distinct difference in seasons means that it’s essential to sow Spring, Summer and Fall plantings on time to make full use of the growing season. If lettuce and greens are planted too late in the Spring then they will bolt in the heat before they mature; if tomatoes are planted too early they may be killed by Spring frosts, too late and you’ll end up with a lot of green, unripe fruit in October; the Fall garden needs to be planted out in late August/ early September to size up before the cold weather sets in.
The charts below are based on the Orleans-Hoopa-Willow Creek area, Sunset climate zone 14, so you'll need to adjust the dates accordingly, sowing later n the Spring and earlier in the Fall.

Mid Klamath Garden Calendar
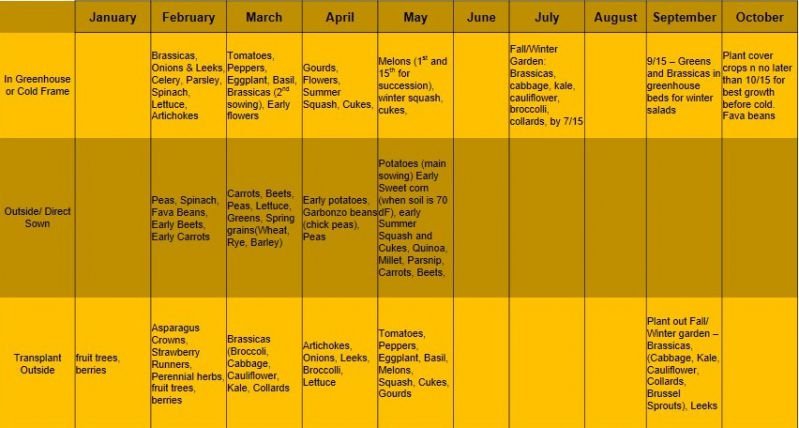
Planting Calendar for Klamath-Trinity Region
Growing Vegetables from Seed
Seeds are sown either directly into the ground or in flats to be transplanted later. What follows is a brief description of the process of growing from seed. Here are several good pamphlets with more details:
Propagating Plants from Seed - A thorough description of growing vegetables from seed, published by Washington State University.
Scheduling Vegetable Plantings for Continuous Harvest - This publication helps growers plan planting times and succession planting, by providing soil temperature germination ranges and other information of assistance to market gardeners.
Sowing seeds in pots or flats. Seeds grown in flats will get a head start on the season; once they are planted in the field they’ll have a head start on weeds and outcompete pests; they can be planted out to the correct spacing, and growing in flats makes watering easier and saves a lot of garden space while you’re waiting for the plants to germinate and size up. Seeds in flats need a warm, sunny place to grow. A sunny windowsill will work, but plants will often become long and “leggy”, from stretching towards the sun. A cold frame or greenhouse is best. See this article on building a cold frame. You can build a quick cold frame with straw bales and old windows by arranging the bales into a U shape and placing the window over the top. The open end prevents the plants from overheating, though you’ll still need to check them on sunny days.
Containers - There is a wide variety of containers available for growing seeds, many can be had for free from nurseries or farms, but be sure to ask if there are any diseases or pests in or on the containers – If you do not already have the brown garden snail or garden slugs then be cautious about bringing potted plants and used seedling flats and containers into your garden as this is the most common way the snails are spread. A container should be at least 3 inches deep to accommodate good root growth. Make sure containers have slits or holes in the bottom so that water can drain freely. Seed flats are large trays with continuous soil, six packs are divided into individuals cells.
Potting Soil – Potting soil is available at any garden supply store, and has the advantage of having the right nutrients and being weed free. You can also make your own potting soil by mixing fertile garden soil with good compost and some sand if necessary. If the compost is not rich enough you’ll need to add a nitrogen source such as well composted manure, be careful not to use too much or the young seedlings will “burn”. Make sure you fill your flats all the way to the top and tap the container, the soil will settle and you want it as full as possible.
Sowing Seeds – Follow the instructions on the seed packet. Rule of thumb is to plant seeds to a depth that is twice their width. For small seeds you can place them and then cover with potting soil, plant larger seeds into mini furrows or press them into the soil. Once planted, seeds need to be kept moist, but not too wet. The number one reason for failure is plants drying out, so if possible put your cold frame or greenhouse in a well-travelled place so that you’ll remember to check your plants often. A light watering from a can or garden spray nozzle will prevent compaction, don’t water with a heavy spray directly into the flats as you’ll end up with hard, compacted soil. Avoid watering too late in the day to prevent molds and “damping off”, a Phytopthora fungus, that can develop in over-watered seed flats and results in seedlings wilting at the soil level.
Transplanting Seedlings – Seedlings grown in six packs can often be transplanted directly into the bed. Seedlings planted at tight spacing in flats will need to be “pricked out” and transplanted into larger containers such as 4 x 4 inch pots. Do this when plants have developed at least two to four true leaves (don’t count the very first leaves that emerge, the cotyledons, these are not true leaves). Plants that benefit from potting, include tomatoes, peppers, eggplant, basil and the brassica family crops - broccoli, cabbage, cauliflower, kale, collards, etc.
Preparing the Garden
You can till the ground as soon as it is ready in the early Spring or late Winter, but if the weather is still cold and wet any seeds may not germinate. Tilling the soil when it’s too wet or dry will destroy the soil structure and kill beneficial microbes. Be careful when using a rototiller as it’s easy to over till and destroy the soil structure this way. To test the soil, grab a handful and squeeze it into a ball, then poke it with a finger. If it doesn’t hold a ball it’s likely to be too dry, if the ball does not fall apart when poked it’s likely to be too wet to till. If you have cover crops to turn in, the best time is when they are in ¾ bloom. Till under with a rototiller or use a shovel to cut and turn the green cover crop. Allow the cover crop to break down for 1-2 weeks depending on the soil temperature. It will need to be watered in to break down.
Use the chart below as a guide for amending your soil. The Biointensive Sustainable Mini-Farming Handbook gives more details on preparing your garden.

Extending the Garden Season
The last frost in the Spring and the first in the Fall set the limit for many garden crops, but there are many ways to extend the season and get better growth. Simple strategies such as protecting plants with a thin layer of fabric or plastic, deciding where you place a plant, and then selecting the right varieties can make the difference between a plant freezing out or thriving. By growing varieties that store well it’s possible to enjoy homegrown produce throughout the winter.
Row Covers
A floating row cover is a lightweight, semi-transparent fabric used to cover garden plants. The lightest fabrics can be laid directly over the garden bed and/or crop without any support and provide a few degrees of frost protection. Slightly heavier fabrics can be supported by wire hoops and provide up to 8 degrees of frost protection. Use 10 gauge hardened galvanized wire cut to 36 inch lengths and bent into an arc, and place them in the soil at 3 to 4 foot intervals. Weigh the edges down with soil, rocks, fence posts, or whatever you have to keep them from blowing away. Row cover has the additional benefit of keeping pests away, such as cabbage worms, tomato hornworms, flea beetles and quail. Be careful with row cover in heavy rain or snow as it can flatten and crush the plants
Cold Frames
A cold frame is a simple structure for raising seedlings, which is low to the ground, with a glass or plastic top, and back and sides made of wood or straw bales. Building a Cold Frame is a great pamphlet by Karen Wortman of Hidden Springs Farms that walks you through the process.
Greenhouses
Most greenhouses in our area are actually just walk-in tunnels; a metal hoop house covered with UV resistant greenhouse plastic. A greenhouse is a tremendous way to extend the season, providing a place to start seeds in flats and containers as well as garden beds for overwintering greens, salads, cold-hardy citrus and even avocados.
Cold Hardy Citrus
Selecting cold hardy varieties of subtropical fruits is another way to extend the season. Citrus trees produce in the winter months when fresh fruit is in low supply, and there are many cold hardy varieties suited to our region. Depending on your microclimate you may need to plant them in a greenhouse or under the eave of a south facing wall, and/ or be willing to cover them during a cold snap. Here’s a list of cold hardy citrus and the low end of temperatures they tolerate: Kumquat, 18 degrees ; Meyer Lemon, 18 degrees F, Satsuma Mandarin, 15 – 18 degrees F, Ichang Lemon, zero degrees F(!), There are also several varieties of cold hardy avocado, including Brazos Belle, Lila, Topa Topa, Mexicola, Joey, Ganter and Fantastic. Cold tolerance ranges from 25 all the way down to 10 degrees.
Storing Fruits and Vegetables
There are many fruit and vegetable varieties that can be stored for fresh produce through the winter. Root crops can be sown in late summer and left in the ground all winter. Sow carrots in early and late July; sow beets, rutabaga, turnips and parsnips in mid August. Winter squash and potatoes will keep for months in a cool, dry, dark place. Fresh fruit is the best source of vitamin C to combat flue season. Varieties of late season fruits that store well, include kiwis, pineapple guavas, persimmons, and apples. Storage apple varieties that do well in our region include Arkansas Black, Braeburn, Fuji, Granny Smith, Hauer, Newtown Pippin, Pink Lady, Spitzenburg, and Waltana.